Saturday, 7 January 2017

Term 2: Tech Fair

7.1.2016

Isn't the mere mention of the Title just mind-blowing? Remember last year? All of the tension? All of the pressure! Well, I pray that this year becomes better.

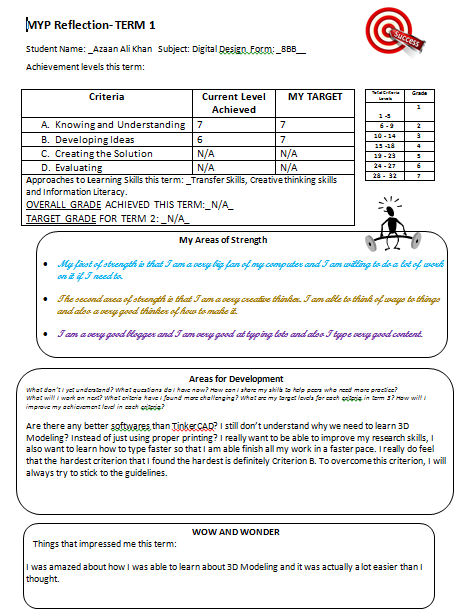
So today we were supposed to look up some Tech Fair Projects as inspiration. I did so and I did make a reflection. The work was completed on a word document I did so. Here it is. I snipped it.


Task 1


Another term, another set of possibilities, hopefully not bad ones.


11/1/2017


Task 2


We were supposed to make a diagram that shows three projects that you would like to do and so I did so. I then chose the project where I will be doing a piece of art. 

I did not do much research as such but I did a lot of thinking about somethings that were unique and something I felt that will drive me do actually do my work. For that, I had to think about some projects that were meeting my interests. I feel that all my ideas were quite good and all of them had pros and cons. I took quite a while to write all of the ideas and a long time to build the pros and cons of each project. After doing that, I took quite a hard look at the diagram and read over the pros and cons a few times and finally I thought to do this. 

25/1/2017


This project was not that difficult, because I am used to making PowerPoint Presentations and it was even easier because I had an outline given from Ms. Veena to make this project a lot more easier. I thought and contemplated about each slide/ category and talked about how I could write something related to my project. 

This project didn't take me that long and it only took me around a day or so. I was actually supposed to stick to the first powerpoint, but the teacher it needed improvement and so
I did improve it, to look better and also to give more information. So, I am thankful for being able to give a better project along with the evidence that I used technology in my work


During the 4th question, I found it quite annoying because a lot of the time, during this project I have been asked, "What are the pros of this project" and so this must have been the 4th time it was asked. I answered the questions normally and as precise as I could. 

The Design Brief on the other hand, was a good change and it was better to answer and fill out. The questions were simple and ample. I was able to understand the meaning of, "Design Brief" and so it was quite good to know what the questions and what the tasks were wanting from me. 


Along with the enormous reflection, I also had to do some MARKING. You see, everyone had to present their chosen project to the class and everyone else was given a marking sheet to mark their projects and also the way they presented. Today everyone has finished (including me) and so, it is now the most appropriate time to show you the paper. 

30/1/2017


Today, I am doing the final reflection of this Criterion. After these reflections, this will be the end of this project. 


Final Reflection of Criterion A: 

I have learnt that I am going to be taking a challenge no one else in the grade is going to do because nobody else wants to do, except for a few other people: which is making art. I also learnt that there are some programs that people have created to make art. So, I will use one of the programs and that is: TinkerCAD. I will not use it for my whole project, but only as a good draft to show a good idea of what I am making. 

I didn't do too much research which is something I regret and so, I cannot mention too many things about the websites that I have used. 

Using my teacher's blogger and her instructions during the Digital Design Classes, I think that I learn't and followed most of the instructions given to make this project idea possible and this blogger a good one. 

I have a bad habit of blanking out and sometimes, I do not focus much. Even while I write this blogger, I find that I get very distracted. So, I was able to meet all deadlines but I my attention in class is a little of a problem. 

I am quite concerned about project and a little bit concerned about reaching the tech fair. If I had to make a call if my project will make it or not, I would say... no. This would be because I think that among all of the competition in the class, my project might not meet the standards and beat all of the amazing technology in the class. I hear about people using EV3s and NXTs from Lego Programming and also two girls and using a cool accessory called, "BBT" and they are editing it as well. 

I might have actually picked a proper technology project like NXTs and EV3s if I could rethink about the project. I am not too sure if I can change back but I don't think I can because I have already given my PowerPoint Presentation and presented it properly.  

I will not redo the project because I have a plan and ready to take on the world of Art with Technology. I am ready for the pressure. Let's do this! 

3/2/2017

So today, I have finalized a draft of how to the poster on the chart paper was going to look like. The reason that the actual one was not done is because, our IT Teacher wasn't here and so she wasn't there to give us the chart paper and I couldn't go to get it from anybody else. So, I used the computer to make a good draft of the basics of the poster. Here is how it looks like: 


Bear in mind that this is only a draft of the BASICS of what the project should contain. That means that compared to what the final poster should look like, this is merely a draft of a part of a project. Only if there is a disastrous reason that my project isn't going well and that my work is not is full working order, then only will this only be in the poster.  

6/3/2017


13/3/2017


During the last two weeks, people (including me) have been doing our project presentations to the class to show the time and effort we took in to create our projects. There were phonmenal projects and so I have been writing on my phone all of the reflections of everybody's projects. I wish I had done better and it really makes me feel like pondering on my project and think about what I should do to succeed next year.  

Project Tech Fair Reflections:

Armaan and Adam:

Their project does help society and they are doing quite well to create the alarm. There was a problem with the alarm at first, so it that's a disadvantage to the project with such a big job to do. The project look like it took quite a bit of time as it was pure aurdino board and it looked quite complex. At the end of the project though, she did say that Aurdino Board programming was meeting the expectations of the students' project. 
Website: Tested. 2017. Know Your Arduino: A Practical Guide to The Most Common Boards - Tested. [ONLINE] Available at: http://www.tested.com/tech/robots/456466-know-your-arduino-guide-most-common-boards/. [Accessed 13 March 2017].

Samia and Alex: 

Their alarm was also quite exceptional and was in perfect working order. They had really made sure it worked and was quite stupendous. They had a primary and secondary project that was made so that if the primary alarm does screw up, then the secondary alarm would be the one to fix the problem. It will be able to create a trigger alarm that can sound people inside the house and a little bit outside as well. 

Rebecca: 

She was inspired by Slo Mo Guys, and made something similar to the them. The art is quite abstract as well. She was using vibration to create paint to levitate and splash all over the canvas and the paper. She has planned the project very well and she has taken a little bit of time to make the project. The music used to make the painting splash was quite amazing and appealing to the ears. Here are the slo mo guys doing their project: 


Azaan: 

Quite bad. I mean they were really nice at the start and they were saying that my project was quite good, but it wasn't in the end. The teacher was a little bit disappointed. My project doesn't require much explainng as the rest lies in the whole of this blog. 

Samim and Hamza:  

Power bank. Prototype and it wasn't working. Solar powered. Helps save electricity bills. They were attempting to penetrate a normal power bank and were trying to put a solar panel in the Bank put it was too dangerous and so it is understandable that the project was not completed. 

Lina and Ban: 

BB8. It's not finished. It looks like it has taken a long time and it their project  it looks very hard to make and it might not be coming out very soon. It will take quite a harsh amount of effort and they are struggling. They did do a fine amount of work on their project though and at the start of the tech fair, their project looked like it would win in the tech fair.  
Karim and Jonas: 

Different types of Car designs. Amazing 3D Modeling software. Extremely creative. Hybrid Car. The car isn't printed out. Not very eco-friendly though. The project is amazing as it was able to 

Heidi: 

She did a lot of research and she was able to download an app to be able to monitor the strength of the WiFi. 

Wednesday, 30 November 2016

Criterion D: Evaluating

30/11/2016

CRITERIA D - EVALUATING THE SOLUTION.

You have to evaluate the solution. You should be able to:

ii. critically evaluate the success of the solution against the design specification
iii. explain how the solution could be improved

iv.Explain the impact of the solution on the client/target audience.

Self-evaluation against Design Specification


Needless to say that since the Evaluation was done by me, I must say that whatever I wrote is true. What I can tell you is: I am a little upset because 5/9 of my requirements are not met and the other 4 are. So I just hope that I could've gotten more met features. 


7/12/2016


TASK 2 - PEER EVALUATION

1) Type the second sub-heading : Peer Evaluation against Design Specification.

2) Type the name of the partner that you will be peer-evaluating.

3) Complete the table shown below for your partner. 

4) The image of this table has to be posted on the peer's blog.

Reflection on what your peers evaluated

  • Did your peer evaluate your blog according to the table? Were you happy with the evaluation.
  • Were his/her suggestions useful to you?
  • What new ideas or suggestions would you implement from those suggested by your peer?


So today, I had to get and give Peer Evaluation for and from Yahya and Bhavya. So, Bhavya was very dedicated and caring enough to give me his Peer Evaluation to me about my blog. So here it is:


I have done Evaluation towards and sent him the Evaluation. Don't believe me? Here it is: 


I feel I have fairly marked Bhavya's blog because I used the table to make sure that the blog is well created and also well marked. I am very happy with the evaluation that Bhavya has given to me and also quite happy about the Evaluation . 

Well, Bhavya didn't give me any suggestions and so I don't have anything to say regarding his suggestions. 


12/11/2016

Final Reflection of the entire Project 

  • Write a paragraph or two about how the solution you made could be improved specifying any particular areas?
  • What ATL skills did you develop with regard to Creative Thinking, Communication and Creative Literacy?
  • What is the Global context you looked at with regard to your creations and how does it relate to Orientation in Time and Space?
  • Do designs created by you be produced in real life situations and appropriate? If so how and if not how?
  • If you were to redo this project again what would you do differently and why?

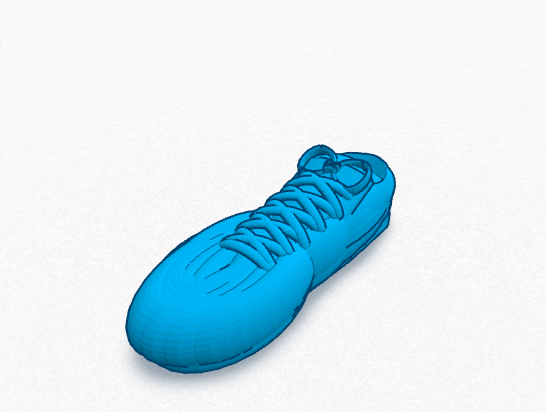
Well, the end of the shoe looks really bad and look like Clown shoes and that makes it very bad; the shoe is supposed to be for running and so, to fix that I would definitely the bottom to make it sloped and the very end should've had the half sphere. The size of the shoe is very random and I didn't follow the  Design Specification very much.

If I hadn't used my Creative Thinking skills, I don't know where I will be. Most of my work in the TinkerCAD shoe designing was required lots of creative thinking. Such examples of this statement would be: When I had to think about how  I was going to create the shoe using the resources in TinkerCAD (what shapes and techniques I was going to use). My Communication in this blog was also very extraordinary. I do remember in one of our classes that the whole lesson was dedicated to this blogger to type on. That's why I feel that this blog, "communicates" to you about what we have been doing in the class. I am not sure what the question exactly means by Creative Literacy, so I cannot give an answer for that.

I really feel that my work is appropriate for Real life Situations because, nowadays people like to monitor their heart rate and their steps and etc. for they find this type of technology very sophisticated and interesting. So, if it were on their shoes, it is also not as bad and it could also be as efficient as the technology we have today.  Plus, the shoes that come now days are just... beautiful, creative, colorful, innovative and pretty much any cool word you can give. Don't believe me? Check out these websites:

http://www.adidas.com/us/men-running-shoes
http://store.nike.com/us/en_us/pw/mens-running-shoes/7puZ8yzZoi3?ipp=120


If I had to do this project again, I would have definitely tried to use a different software because that there are some really good softwares that can really work out on making some very technological and futuristic shoes.

12/12/16

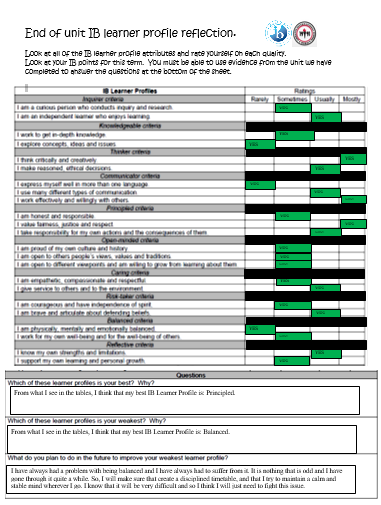
This the ATL REFLECTION.


This is for the end of the topic generally.


This is regarding the IB Learner Profile. 


Wednesday, 16 November 2016

Criterion C: Creating The Solution

16.11.2016

Exploring TinkerCad Skills and to create my chosen design.


INSTRUCTIONS: 

1. Put a screenshot of your object on your blog. 
2. Create a plan of the steps that you followed for creating the product.

Write a reflection on your blog after each product by answering the following questions:- 

REFLECTION

1) What are the basic shapes that you used to create the product?
2) What are the techniques that you have used for creating the product?( eg:- making holes, making curves etc)
3) What are the challenging things that you encountered while creating the product? 


23/11/2016


My Shoe Design so far... 

So far, my work on TinkerCad to create the electronic shoe that can monitor steps, distance, time the shoe has been worn and also the amount of calories burnt... is not finished yet. The steps will be written down once it has been finished which should be (don't take my word for it) 27/11/2016. This is how it looks so far: 

I tried to get a full 360 Degree view of whatever is on my shoe so far. All I have to do now is to focus on the top of the shoe and I should be done. I also need to confirm with my drawings that this is matching it. 


27/11/2016


The Masterpiece Presentation

So, I was finally able to finish my shoes on TinkerCad and take screenshots of them. Here they are:

Left of the shoes

Front of the shoes

Right of the shoe

Back of the shoe


Personally, I tried my best to make the best shoes but compared to some of the others that I found on the Internet, this isn't the best. This is probably one of the worst. In fact, if you want, here are some shoes created by others that I found in the TinkerCAD Gallery: 


As you can see, if you compare mine to other people's projects on TinkerCad I would say that my level of skill on TinkerCAD is quite low. I must repeat, I did do my best.


Don't get me started on the ways to create my shoes. They are quite long and I am not sure if I will be able to remember it all. I will try anyway:

Steps on how to make the shoe. 


  • I start by going to the Geometric Library and taking out 2 round roofs and rotating them in 90 Degrees clockwise for the one on the right and for the one on the left, rotate the round roof 90 Degrees anticlockwise. 
  • Next, get another round roof and and put it on the back of the 2 round roofs that are playing the role of the sides of the shoe. Make sure that the flat side is being placed on the back of the shoe so that the curved area sticks out. 
  • The next thing is to get a half sphere and put it exactly on the opposite of the round roof that is placed at the end of the shoe. Place the half sphere in such a way that both the flat sides are facing each other. 
  • Now, the round roof at the back of the shoe should be stretched in height. Do it to the most appropriate height, because this is going to be the heel counter. 

  • The next thing is to prepare the sides of the shoe. Since I had to follow my design on paper, I had to get 2 boxes from the Geometric Library and I had to make the thickness of the boxes quite small because and the length of the box had to be made in such a way that it turned into a box to a rectangle. 
  • I repeated making those boxes and then over lapped them on top of each other to make the cross and also to make the A-like structure on side of my shoe. 

  • Probably the hardest part of making the shoe: Making the monitors. To make the monitors, I had to get a lot of numbers from the numbers library because there is no feature where I can type in the numbers that I need (This is something I wish that the developer of TinkerCAD install). So, I got out all the numbers and also all of the letters that I needed to write some words. 
  • The next thing I used was to put the numbers and the letters together to make the proper words and numbers. Ex: If I were to pull out the numbers 1, 5, 0 and the letters C, A, L, S. I would put them together to make: 150 Cals. 
  • Once you've made the right numbers and letters, you can finally group and put them aside. 
  • Next, get a box and make it like a flat rectangle with the thickness of 1. Then, put those numbers and letters onto the box. That box can act as your screen of the digital screen. 
  • The hardest part of the whole making of the shoe: To show that I will be having a cover to resemble that my shoe digital monitor is protected by a water resistant and scratch resistant and heat resistant cover, I need to put lines in the monitor. I can only put them vertically and not horizontally because if I were to do that, then the letters and numbers would become messed up. So, strategically, the boxes have to become like little I's so that they could go into the digital screen without messing up the numbers. 
  • If you have followed it correctly and done it how did in my shoe: This is how the monitor should look like:  


The next thing that comes that is indeed one of the most important of them all is: The FPA (Foot Placement Area) and this was quite a lucky thing for me. I will not give the story but I will just tell you how to make the FPA.

  • First, go to the Holes Library and take out a square shape hole. Now, adjust the square in such a way that the foot can be placed properly. The next thing that you need to do is to select (using Right clicking and holding down shift) the hole shape, and the 2 sides of the shoe. Then press the "Group" button which is close to the top right hand corner of the screen. Then once that is done, ungroup everything and wait for 2 seconds. There you go, there should a hole in the shoe for the foot to be placed. This should look like the example below: 

The next are the laces, and the most realistic part of the shoe. I really do love this part of the shoe because it really gives a good touch to the shoe. Here is how it is done: 

  • Get a round roof shape from the Geometric Library and then place it in front of the Hole Square Shape that you used to create the hole. Then raise it up in such a way that the round roof is in line with the Square Shape Hole. If this sounds confusing, you will be able to get it as you do it. 
  • Next are the laces. For this I took 6 spheres and I got a new shape that I haven't mentioned yet: A Torus. There are 3 different types of Toruses and they are: Torus Thin, Normal Torus and also Thick Torus. Depending on the size of the lace you want, you need to make the laces. 
  • You take out the 6 spheres and put 3 on each side. Then, try to adjust the last toruses to be able to connect with the spheres. 
  • Group the spheres with the toruses.
  • To cover your tracks, try to put the lower part of the torus under the round roof so that it looks from the outside that the laces are connecting with the spheres.  

  • The next thing that need to be done for the laces are is the classical knot to symbolize the shoe's laces. For this, you will need to go to the Geometric Library and get out 2 Thin Toruses, 1 sphere and 2 boxes.  Now, rotate the toruses so that they look like the bunny ears of the knot. Then, at the end of the bunny ears, place the sphere in between them to resemble the knot. The 2 boxes will be used to make very small, french fry like, rectangles to resemble the end of the laces after using tying the knot. 
If you followed all of these instruction carefully and you are able to make laces look similar (if not same) to the shoe, the laces should look like this: 


  • I can't not believe that I have not mentioned this at the start but I guess I will do now, the LOGO! Now, the Logo is not hard because it is basically placing an A near the heel. The hard part might be if you do not find space to put it. So that is why you might struggle but otherwise there is no other reason to be struggling. This is how it should look like if you are trying to copy my shoe. 


  • The next thing is to make the memory foam of the shoe which is supposed to be under the shoe.
  • Start by getting a box from the Geometric Library and color it black. Make the box a little bit thick because it should make the runner feel that he/she is running on air/clouds. 
  • Put is under the shoe by raising the shoe; select everything in the shoe by holding the left click on the mouse and drag it to cover everything. 
  • Then, there is a black arrow at the top of the shoe, hold on it and raise the shoe. Finally, the shoe will be raising up. Please do not raise too high so that you can see the shadow of the shoe. 
  • The shadow of the shoe will be able to be presented on the workplane and then, using the shadow, place the memory foam under the shoe.
  • Bring the shoe back down and make sure that it is presentable when seen on TinkerCAD. 
If you want to see the memory foam: here it is: 


Reflection 

The most common shapes that are being used in this shoe are: Round Roofs, Boxes, letters and numbers, spheres and toruses.

I used a lot of copying and pasting. I had to do quite a bit of grouping. Usually, I use Alt to copy shapes but I didn't use it in this case. I also used my skills of my making holes.

I found it difficult to make the shoe realistic and at the same time maintain a proper shoe form. I think making the monitors of the shoe and also putting the cover of the monitor was even harder. Also making the border (front, back, left and right) of the shoe realistic was difficult because, like Ms. Veena said, the shoe will not meet our expectations due to the limitations of the shoe.

Wednesday, 26 October 2016

Criterion B-Developing Ideas.

Criterion B- Developing Ideas                                   26/10/2016

There are four strands to this. 
-Design specification
-Design sketches and ideas
-Planning 
-Choosing a design


26.10.2016


Design Specifications.

So, in this lesson today we focused mainly on underlining keywords. So, this is how the lovely Ms. Veena told us to do in Digital Design today. So this is how it worked, Ms. Veena displayed an essay on the board using the projector. Then she read it out and the essay was about Board Games. The activity was to get at least 25 keywords inside of a funnel which was drawn on our papers.

Then after that, we were supposed to be paired up. So I paired with Youseif. Then we shared answers. 

The next task was to narrow the 25 words to 5 most important words. So our 5 words are: Themes, Portable, Colorful, Dice and Instructions. Below are the words I got and the 5 words in a different funnel 


Next, under the 2nd funnel, we wrote Specifications points for each word. So, I wrote the 5 points. Out of the 5, 4 were crossed out with a Red Pen because they were very bad specification points. 

So these are the new ones:

  • Dice: Boardgames usually contain a dice that has 6 sides, and each side contains a number from 1-6. 
  • Instructions: Every single board will have instructions that state the rules and regulations of the game. This makes the game fun and gives the game its, "Shape". 
  • Themes: By themes, I can give some examples: Chess has an medieval theme because the pieces on the board are related to the Medieval times (such as: Horses, Rooks, Kings, Queen, etc). Monopoly has a business theme because it's all about selling products and gaining money. From the examples, you can say that themes give the game a good taste and feeling to the game. 
  • Colourful: The packaging, the counters, and the board itself all need to be colourful. This is so that the game isn't dull and that they playing brightens the players. 
  • Portable: Most, if not all, are portable. This is because the packaging of the game acts as a case/ box that people can use for transportation of the game. This makes gives more time to enjoy the game and that you can enjoy wherever you are. 


So, I will took my Design Situation to a Design Brief. Now... I will take them into a Design Specifications. The Specifications are in the form of a table which was created on Word Document.


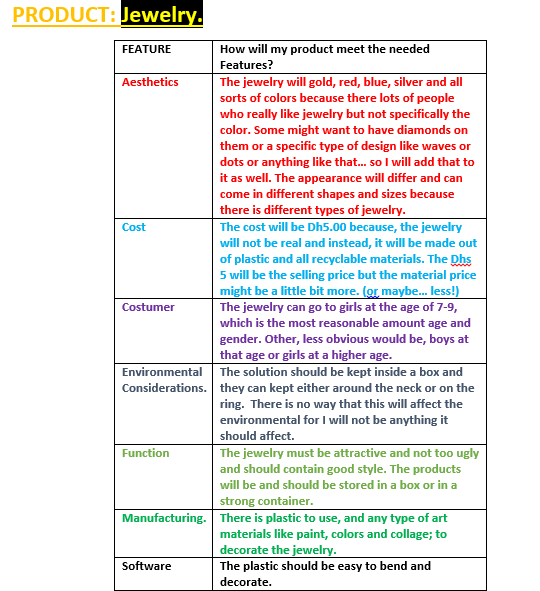
Here is Design Specification #1:


Note: I have decided to split the table up into different pictures instead of the whole thing in one snip. This way, you can see better.


This is Design Specification #2

I have done the same thing in #1 in number 2: To take separate pictures of the table.


This is my 3rd Design Specification. 

THIS IS REGARDING THE TECHNOLOGICAL SHOE. 


You might be surprised that I have a 3 Design Specifications even though I have 2 Design Situations and 2 Design Briefs. The reason is: 

Ms. Veena had told us that our product should be something that has not been created yet. So when I checked my work, I noticed that both of my products were already too basic and that there was sure to be a digital clock and plastic jewelry in the stores. So, if I added this shoe that could read the amount of time exercised and the amount of calories burnt. 

Since I was adding a new product I had to do another specification, for it. 


7/11/2016

Explosive things happened to me in IT today. First of all, I had decided to work on the sketches of all my work. I was told then that I was had to make 3 different types of designs for all three of my products. So, by doing the math: 3 products x 3 types of designs for each product = 9 papers that contain a type of design for a specific type of product. 

After hearing this, me and Ms. Veena had a little discussion on this and I soon realized that the jewelry work is going to be a hassle because my idea is too vague and so all types of jewelry were going to have to be implemented. So, I decided not to do the sketch idea for the jewelry product. 

That led me with 2 products to do. They were: The shoe that can monitor your: Amount of time that the owner (of the shoe) wears his/her shoes, the total distance that have been covered by the runner, the amount of steps that the owner takes and finally, the amount of calories that the owner burns. COURTESY TO ARMAAN MOHAMEED because he helped me in getting the ideas of what shoe's capability should be. I did 2 of them and after critiques from him, he told me 2 more ideas to implement in the shoe.


Here are the design sketches for the shoe: 


So, the shoes above are actually the last ones that I have designed. The look pretty good in my opinion and they look more like basket ball shoes. Unlike the other shoes below, they don't have a 3D Foot Placement area (where the topline, insole and other places where the foot is placed in). By the way, FPA stands for, "Foot Placement Area". This is something I just realized as I write this, so please forgive me if that doesn't look that appealing to you. 

The shoe is similar to everything in the other shoes, so there might not be that much difference in the shoes except for their designs. 


First shoes designed, and my favorite looking shoes. I tried to imitate the looks of Asic's and Reebok's shoes. The ones that lines on them for style. I really do think that they look good and that I did a good job. Just like the other shoes, this one has the monitors. This also has a tongue. This also has a 3D Foot Placement area.  


These shoes were the 2nd shoes that I designed. It has a really, really basic design and there's really nothing special about these shoes. The only thing that is unique is this: The pink part of the shoe. Like how Sketchers have something something called, "Memory Foam", which is basically a material that is so soft, that makes you feel that you are walking on air. So, in this case, I think the bottom of the shoe should be made completely made of, "Memory Foam".

By the way, I just wanted to let all of you know, that I have used one of the photos from Google for inspiration. This is the photo: 


This the reference: '

CanStockPhoto. 2016. Athletic shoes illustrations and clipart (3,387). [ONLINE] Available at: http://www.canstockphoto.com/illustration/athletic-shoes.html. [Accessed 9 November 2016]


11/8/2016


Yesterday, I did all of my shoe design sketches. This time, I am going to display to you my design sketches of the digital clock. 


The first picture and the second picture are both linked into one design but with different views of the clock. This is the initial design that I thought of. Then, where I realized that I had to make more different types of designs, I got creative and I am starting to think that the pictures below are actually better. 

The clock has a blue colored digital screen and the case of the screen is colored red. The case is supposed to be made out of decals of music and sports.  

This is probably something I don't want to buy or create. That's because it's very badly drawn and also very badly colored in. I don't know how many marks this clock would give me. If I had to be the marker, it would be: 5 on the MYP Scale. 


This is the last creation that I designed and I wanted to make it a long clock which has a stand. 

What I really do like is that the decals here are really good because they have good vocab words like: SIX! HOMERUN! GOAL! I feel that they really do stand out. They were done quite well to stand out and was really able to keep its shape and color. The green and the scarlet color match really well too. 

The stand can really be better because, it's really not that well drawn. I think that's the only real problem with this clock. 

The reason that this clock is actually quite satisfying to me in my descriptions is because, this is the was the last clock that I designed and so I was able to learn from all my mistakes. 


For this one, there are literally 5 decals on the digital clock because, my Sharpie was not able to properly work on the crayon coloring, so I just kept the colors on the clock because it looked quite good without the decals anyway. 

I must say, I was quite right. The photo was quite exquisite but the biggest problem is, it looks more like a tissue box than a digital clock. I really do hope though that I get good marks for my coloring and creativity because, remember, I had to think of more designs when I found out I needed 3. This and the clock above were both clocks that came from the top of my head and they turned out pretty well in my eyes. 

9/11/2016


This is the evaluation of my designs that were posted on this blog. It worked like this: Any 3 people who wanted to check out my designs out, they would go to my blog and would fill out a column, either as Person 1, Person 2 and Person 3. The names of the people who checked my designs are given above: Adam, Ban and Jonas. 

I appears that they all gave the same answers. They have all said that my shoes are the best ideas and that the first and 2nd shoes are really good. They have said to add more details and more designs to more shoes, I will think about that. 

I am happy that they were happy to see my designs and that they like my shoes because the truth is, I actually love to shoe design and so if they love my shoe designs, this means that my skill of shoe designing is good. This uplifts me and gives a spark of light in my heart.


17/11/2016

After going through my design specification table, I was told to check if my product was meeting all if not most of the standards that I wrote down on my Specification Table. Now, since I did 2 products that were sketched, I had to decide which one to discard/not do. So, after some quick thinking, I chose to discard the clock project because, it's already a product in this world of technology and I also like to do shoe designing. So, I stuck to the shoes. Finally, this is what the shoes looked like (after going through the Design Specification Table). 


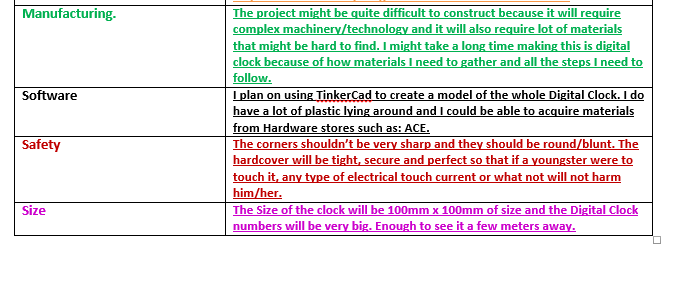
I also made this table to determine which was to determine which project I was going to pick and also how the final project should like.