This lesson was about grouping making holes inside the shapes. I was given a wrench at the start of the lesson and it was laying there on the workplace.
So I started by going to the shapes Library and I got out a Hexagonal Prism. I placed it in such a way that it was connecting. Then they showed me something called the Inspector which changes the color of the shape that is selected and allows you to make a, "Hole" inside the shape. So I pressed the, "Hole" button and the shape turned into what it looks at the top.
Finally it taught me something I will never forget in my whole life of TinkerCad: Grouping. Grouping is when you put 2 or more 3D Objects together to make one big object. Take the top image as an example: The Wrench and Hexagonal Prism were both selected by using Shift and in the top right hand corner, there was a called "Group", and this made the 2 shapes together.
If you don't believe me, then look at the light blue box at the bottom. They are covering both of the objects, which shows that they have become one object.
So for this one, they laid all the letters of the alphabet on the workplace, and they put the Key Chain Model. Then it taught us how to make our project private so that no one else could access it. The next step was to take whatever letters we needed from the alphabet that was laid on the workplace and put in on the Key Chain. I had to copy and paste a few of the letters because I happen to have the same letter (A) repeated more than twice.
I had accidentally deleted the Bs in the alphabet, because I thought I wouldn't need any of them. That's when I remembered that I needed 2 Bs because my class is 8BB. So I went into the letters Library on the right side of the page and brought 2 from there.
For this type of work on the die, I learned how to move the WorkPlace to a higher level that it is in default. This looked like an actually dice and was quite uneasy but not impossible.
10/10/2016
Today, I and my class focused on doing 10 lessons of TinkerCad. That is also I was able to do in class and at home. The following snips of photos show that I have taken the lessons and whI did in them. The only thing in my descriptions is that I don't know which I did first and which I second and so on and so forth. (Please excuse the fact that the font is kept in the middle instead on the left side of the page, unlike this one.)
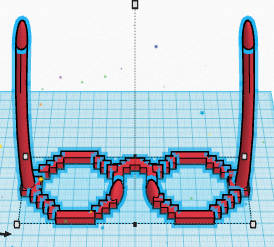
Lesson 7: Minecraft Party Glasses.
|
|
| Party glasses by yours truly. |
So these glasses were done in class and took so long that I it was the only lesson that I was able to finish successfully (the others you will see today are all done at home). I do have to admit though a few things:
I learnt to use the Alt Trick which basically copies a shape and then moves it to another place AT THE SAME TIME.
Then a lot of my friends have helped me with a lot of camera movements.
The best people to ask help for, in TinkerCad should be Bhavya and Armaan,
Finally, at the end of this lesson, I can see that with a lot of time and effort, you can make some basic but cool things.
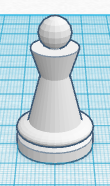
Lesson 8: Chess Pawn.
This was quite annoying and actually took a long time. This is because there was a lot... a LOT of stacking up and the workplace had to be moved quite a lot of times. This made me able to stack the materials together. These materials were like: A Sphere, a back flipped cone, etc.
Finally the final result, thanks to TinkerCad's awesome creativity, they were able to create a cool and realistic pawn. As I write this I realize that this is a very high skilled lesson because to have the same creativity that TinkerCad had to create this would be amazing. Putting the most unexpected shapes together to make a Pawn was very creative.
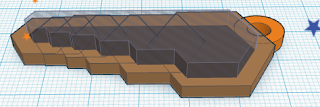
Lesson 9: Saw.
So after making the chess pawn and the Minecraft Party Glasses. I thought is couldn't get any harder. I was wrong. The SAW is harder to make than it looks. The reason being that I had to put 5 or 6 hexagons, right next to each other and the problem was that each hexagon that moved to the right, it had to become bigger and so it was hard to make sure that all the hexagons had to follow the orange line. It was not easy but I tried.
In this lesson, they taught me how to use Ctrl+D, which means to Duplicate an object that is selected. Then this brought a question up in my head: Why is there 3 ways to a duplicate shape/object? Why isn't there just one. If you were wondering what they were (the 3 ways to Duplicate an object):
- The Alt trick: Hold the Alt button and then move the object to another place, and there will be an automatic copy in the, "another place".
- Copy and paste: This is very self explanatory because all you do is: Pick a shape, Ctrl+C, Ctrl+V and then drag the shape to the other designated area.
- Ctrl+D: Choose an object, do Ctrl+D and then move that Duplicated Shape to the other place.
Lesson 10: Paper Clip.
PHOTO OF MY WORK IS SADLY NOT AVAILABLE.
Azaan, where is the photo?! Ok... I was not able to retrieve it. You see: I was working on it and I knew I was not going to finish it because I was struggling and it was taking a long time. So I saved my work and left it.
I opened it again, and I still couldn't finish it. Then came the sound of my father telling me that I had to leave for an event. So, when I came back, I couldn't find. I really couldn't finish it and I couldn't find it in the lessons area and even the projects area (sometimes my lessons get taken into the projects area). I still couldn't find it!
The good news is that I still remember some of my progress on this work. I remember that I was stuck on box and moving the workplace and then after it, I had to change the dimensions of the box. It was quite difficult and if I did finish it, then my work would be on this blog.
Lesson 11: Die from Scratch
This is 10 times much easier than the SAW project or any project that is under the number 7. That's because it's the exact same as Lesson Number 6. The only thing different is how we had to drag everything ourselves. It was super easy and I think this should have been lesson number 8 or something like that.
It told me that I had to group all the numbers together. That is what makes all the numbers white, the die was white and so since I grouped the numbers up with the die, the numbers became white as well. At first, I followed all of the instructions and none of the numbers came up. So, then I ungrouped all of the numbers with the die and then redid it, and that time, it came out well.
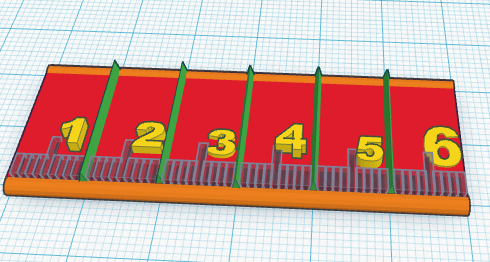
Lesson 12: Ruler 10cm
This was quite time consuming. The steps were quite easy TO FOLLOW but there WAS TOO MANY! The difficulty was low but the quantity was high and that made this project really annoying.
It required me do a lot of copy and pasting. Because I constantly had to keep copy and pasting roof shapes, then I had to change their dimensions and I also had to convert some into hole features and not solid figures.
Just like the paper clip, I lost the instructions of making the ruler. So, using my crafty mind, I used my mind and went into a new tab and took another lesson for making the ruler and it told me the instructions then. By the time I lost the instructions, I knew I was around the 6th step or so. So I was able to follow the right numbers.
The ruler was supposed to be 10cm long but it's only 6 cm long because, the box that was then turned into a flat rectangle was only so long that I forgot 2 things: I had to make it 10cm and how to expand the length of the flat rectangle. It was stupid but I tried my best. The ruler looks good though right?
Lesson 13: Basic Button
For this one, they told me take a cylinder and to make the height really small. So I did that, the next thing they asked me to do was to take 2 cylinders and make them really tall and also really thin. Then they asked me to use the Hole feature for the 2 cylinders. Finally they asked me to place those cylinders in the middle of the button. They told me the lesson was over but I knew it wasn't over.
Since the cylinders were so tall, I knew that it was not possible for it to be a proper button and so I made the cylinders (that had the hole feature on them) to be about the height of being able to make 2 small holes inside the button.
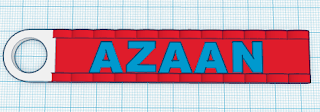
Then finally, I don't know what number this one is or anything but I found it in my lessons page so I think I should put it up here.
Well, there were no instructions and when I found this in the lessons page and I opened it up, there was letters put up, and the key ring that was pre-made. I really didn't know what to do or what I had to do so I just took the letters that could fit my name and then I put them on the ring. I changed all the letters' colors to blue. So this how it looks.
Naturally, I found really easy and it was something that I was able to finish in around 2-3 mins.
12/10/2016.
Today, we are focusing on a project. The Design Situation has been created and now it needs to be solved using TinkerCad. Then after that, I have to create a 2 other projects. So here is the Design Situation that was given from the teacher:
The UAE Nurses Association claims that one of the most difficult parts of their job is dealing with small children who have a fear of needles. Although the association has some tips and tricks like putting numbing cream to partially freeze the surface of the skin before injecting medicine, sometimes the anxiety levels of small children are so high that it is difficult to get them to hold still. If only there was an easier way to administer medicine within the syringe.
CREATE A USER FRIENDLY SYRINGE AND WRITE YOUR REFLECTIONS
Now this is my Child Friendly Syringe.
So if you don't know what this is, this is a Iron Man model and inside it, the syringe lays inside it. If you don't believe me, please notice the little stick at the top of Iron Man. That stick comes from a real syringe that was created by me. I created the real syringe and behind the Iron Man model and to make the Iron Man say that he likes it and that the syringe makes him strong and smart. This would make it sort of a like an advertisement.
So after getting some feedback from my mom, she said that I should put the actual syringe inside the Iron Man. So, I did some work on the colors of the syringe. Then I even did some editing on the Iron Man himself.
So why did I do this you might ask. Well, it's because a lot of teens/adolescents really like Iron Man. I can prove this by saying this: Whenever I walk into my school, I see a lot children coming to school with Iron Man styled bags and a lot of adults and teens (especially) watch Iron Man movies, I thought that Iron Man was the best way to go.
HERE IS THE NEXT TASK WE WERE GIVEN.
With the above scenario in mind you have to write a problem situation of your own to develop 2 OTHER products in TinkerCAD. A problem situation is called as a design situation.
You may choose from the following options to develop a design situation:-
- Figures, Miniatures and Home Décor
- Toy item
- Jewellery
So now, I am going to be writing about 2 more design situations right now. I hope they are good and that they are good enough for being qualified.
Design Situation #1
Teenagers have very busy lives. School, family and social activities mean that being punctual is very important.
I will design and make a wall clock that will be appealing for teenage boys. It will be a modern design and will be suitable for a teenage boys bedroom. Because the design will appeal to teenage boys, them they will be more likely to look at it, read the time and therefore not be late.
Boys teenagers usually always have somewhere to be. They can be at concerts to either play or listen to music. They might need to go to Football, BasketBall, Cricket, etc match to play. They even need to know when to start studying for school. Just like me, the wall clock will be very useful and a necessity to teenage Boys. Usually, I need to know what time is when I wake up. Since I need to leave the house at seven, my alarm is set to 6:15am. So, if I see that I wake up at say 6:30 (which means that I over sleep by 15 mins) then that means that I know that I need to get ready even faster. So my clock really saves me.
So I can make the clock attractive by having really bright colors. Then I can also design it to have a different outline and not just a round shape. Finally, the inside should also contain rock-stars or footballers and what not. Another idea is that it can be a digital clock, to make it easy to read the time. This also links it to the modern world because a lot of people use digital clocks more.
Here is some evidence:
Using this web link: YouGov: What the world thinks. 2016. YouGov | Almost 60% of 16-34 year olds use a phone as their primary timepiece . [ONLINE] Available at: https://today.yougov.com/news/2011/05/05/brother-do-you-have-time/. [Accessed 22 October 2016].
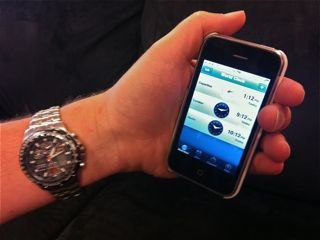 It turns out that 16% of people use digital clocks and Hispanics are more likely to be found with a Digital Watch! Although 16% doesn't sound like a whole lot, 60% people from ages 16-34 years old have been found using their PHONES as their primary way of telling the time, even if they have a watch with them! Everyone should know that most if not all phones contain Digital Clocks on them; this would mean that people would accept the digital clocks.
Another explosive study that I just found out by this website:
Gallup, Inc.. 2016. Teens and Sports: "Let's Play" | Gallup . [ONLINE] Available at:http://www.gallup.com/poll/5710/teens-sports-lets-play.aspx. [Accessed 22 October 2016].
It turns out that whoever are above average and excel very well in school turn out to play a lot of sport. This percentage also happens to be 57%! This is really shocking because now I have learnt how sports can really help the academic life.
Do you see the link? Those who usually do good work in school are good time-managers. Those who do good work in school (for teenagers) are known to play a lot sports. Which would mean that those who are really good time managers. In conclusion it would be perfect if the clock would have a sporty theme; this will make school work a lot easier.
Design Situation #2:
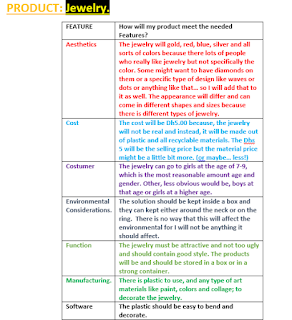
2. A person started a shop that sells some Plastic and unreal Necklaces, Bangles, Earrings to little girls (and boys if they want ;) ). The store just opened up and are still not able to get/afford proper diamonds, gold, etc to create real jewellery. So they decided to use and
STICK TO using TinkerCad so that they could make lots of child friendly and fancy looking jewellery. They will also be a lot more flexible in their creations. This will attract more people and more people since they will have a different range of Jewellery.
They are trying to look for jewellery such as:
- Rings.
- Necklaces.
- Earrings.
- Bracelets.
- Heavy Earrings.
And the designs should be Diamond, Gold and Silver or just plastic jewellery that is colorful.
After doing a survey with around 10 people: The results were given in on the different types of results:
Question: What jewellery do you like?
The results are:
Rings: 1
Necklaces: 0
Earrings: 2
Bracelets: 5
Heavy earrings: 1
Chokers: 6
The next question is: What design do you like?
Diamond: 5
Silver: 3
Gold: 0
Colorful: 1
Please note: The 10 people that I asked were allowed to give more than 1 answer. So if there are more the amount of votes given are more than 10, then please understand that a few people have decided to choose more than 1 answer.
So after using these results, they had shown that Bracelets and Chokers are really big. Surprisingly, there were no Necklaces. So, using the results, the people who are designing their products can use this data to definitely tell that a vast majority of people will be willing to buy a lot of Chokers and Bracelets. Although, there were little results for the other jewellery they can still make a good quantity of Necklaces, Earrings, etc because only around 10 people were asked.
Design Briefs.
Now, each of my Design Situations will now be put into a design Brief.
Design Brief #1
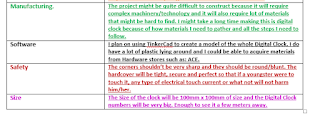
So I am going to be designing a round Digital Clock that will be used to tell the basic time. The design will contain sports people and rockstars and it will also contain bright colors to make the project attractive and eye-catching.
The Digital Clock will be focused on teenage boys because, a lot of boys love rockstars/singers and sports fantaics (I am not saying that girls but my intention is that is will be focued on boys.)
My design situation should be used in the bedroom of a teenage boy. They can also be kept in any part of the house and they will still be able to hold the same purpose. That purpose will be to tell the time.
The clock doesn't necessarily need to be focused on Teenage Boys... it can even go to younger boys who have a passion for music or sports. It can also be appropriate for teenage girls and normal girls.
I mainly plan on using TinkerCad for this project but I will try to use blender because I believe that Blender or SketchUp because I believe they are both supposed to really good 3D Builders.
I want to make this digital clock because it will help teenagers and with knowing the time. I want to make this Digital Clock to make the life of a teenager, or even any other person's life easier.
Design Brief #2
So this design brief will be focused on creating jewellery that will be used by kids who are kids because the jewellery will not be real and so I don't think adults and teenagers will accept unreal/plastic jewellery. In the shops, people will be selling the jewellery which will definitely be created TinkerCad or maybe, just maybe, SketchUp. The colors and design will be well thought out and will follow the basic rules of how each jewellery is followed. Yet, to make it more fun, I will even make some strange looking jewellery that little girls (or maybe boys) will like.
30/10/16
I received my Peer Evaluation from Armaan about my blogger and he has given me very nice remarks. I am happy that he liked it. Here is his Evaluation of my blog.
If it is yes, that means that, a certain piece of work has been completed. If it says unfinished, then that means that, a certain piece of work has been incompleted, but it's partially completed. No means that that piece is not there and was never there.
I really like Armaan's comments and I feel that his marking was quite soft and not too tough. I really do like my blogger as well and I feel that it was also well done.
5/11/2016.
After doing all the work that said, "No" in Armaan's peer evaluation, I was able to finish the table myself. I think I did well on it this time. Since I had completed all of the unfinished work, I can now show the updated version of the Peer Evaluation. I myself actually have edited the remarks of the table WITH THE PERMISSION OF ARMAAN SO THERE IS NO CHEATING IN THE TABLE.


